A blog post without images is like spring without flowers. It’s gloomy.
Images give a blog post much-needed color. Your target audience needs that color between the gray blocks of text if you want them to stay till the conclusion.
A 2021 Venngage study found that images play a crucial role in gaining and maintaining the target audiences’ attention. Of the 200 marketers interviewed, 61.4% said visual content was critical in their content marketing strategy.
In other words, your blog posts need images. So let’s head over to Pexels and Pixabay, right?
Well… no.
Because, let’s be honest, setting aside five minutes in your schedule to scoop random stock photos isn’t exactly a recipe for success in terms of using visuals to your advantage. Your images should complement your blog content.
Read on to learn more about the best practices for blog images and how you can make the best impression on your readers.
Jump Ahead to a Specific Section:
Best Practices for Blog Images: How To Level Up Your Visual Strategy
Why Are Images Important for Content Marketing
Best Practices for Blog Images
- Ensure the Images Add Value
- Use High-Quality Images
- Source and Create High-Quality Images
- Stay Consistent
- Choose Image Placement Carefully
- Include Alternate (Alt) Text
- Add a Featured Image
Final Thoughts: Best Practices for Blog Images To Grow Your Audience
Why Are Images Important for Content Marketing

Images speak louder than words. They tell a story and are a powerful tool to catch the reader’s attention.
We don’t actually take in images in the blink of an eye, but it is much faster than reading. Think of images as a TL;DR summary for sections of your articles. They let readers quickly digest the idea of a section, and then you can fill in details with words. In addition, the human brain tends to retain visual information longer than verbal or written information.
This is enough proof that a picture is worth a thousand words. Adding compelling images to written content can enable your readers to remember them longer than they would otherwise.
But only if you follow these image best practices.
Best Practices for Blog Images
Choosing the right image is more than selecting an image that matches well with the content. It should supplement the content.
In other words, the images you add should enhance the message in your written text and reinforce your expertise.
Here’s how you can improve your blog images:
1. Ensure the Images Add Value
Images should enhance and complement your text. They reinforce your words and often make the concepts more understandable.
For example, if you need to present number-driven data like how many updates Google released in 2023, the string of numbers and dates can become confusing for anyone but the most committed math fans. Using a graphic illustrating that data helps translate the data from concept to reality for most of us. It adds value and clarity to the writing.
Also, avoid generic images that don’t add value to your written information. Images and graphics work best if they relate to the content of the article itself rather than the broader theme of the topic. Whether they are unique, stock, screenshots, or GIFs, they should be directly relatable to the article.
Images with no connection to the topic or article at all are especially problematic. For example, suppose your article is about the best WordPress theme for a restaurant website. In that case, using a funny dancing GIF won’t make any sense or add value to the article’s content — but some example screenshots definitely could!
That’s not to say GIFs are bad, just that they need to follow the same relevance rules as still images.
2. Use High-Quality Images

Image Source (Pixabay standard license)
Ensure that the images you use are high quality. The web is a media-saturated place. Your pictures and illustrations should be able to stand out in this oversaturated internet world and successfully attract the reader’s attention.
The following image situations can leave a bad impression:
- Out of focus
- Low resolution
- Poor lighting
- White balance is so off that the whites appear yellow
However, be sure not to upload overly large image files, or you risk slowing down your blog’s loading time. For most blog posts, the largest image size you’ll need is 1024×1024 pixels. Monitors display images at lower resolutions than print files. Even the mighty iMac runs around 218 pixels per inch (PPI). So a 1024×1024 pixel image displays natively as over four and a half inches square. That’s more than enough for most blog widths and is still reasonable for printing.
3. Source and Create High-Quality Images

Finding and creating high-quality images is more complex than hitting your favorite copyright-free or share-alike licensed stock photo website.
While free and nearly free photography websites like Pexels and Unsplash may look like wonderful choices for a small blog, there are some inherent risks. Most of the free image sites offer no indemnity for the user.
So if you are sued because someone illegally uploaded a copyrighted image to the website, you may still be held liable. Most of these sites don’t include model releases either. So if you use a recognizable photo of a person in a sensitive blog post, the model might sue.
Tools like Canva offer a more secure image use license and low-cost access to quality stock photography and graphics. But without heavy modifications to stock assets, your blog can start to look very cut and paste.
If your brand has a particularly fun or cheeky outlook, you might even consider Giphy-sourced GIFs to spice up your blogs! But be careful to choose GIFs with good-quality images that are big enough for your needs.
It can be hard to do better than professional stock photographs on your own. After all, professional photographers spend years developing their skills and a lot of money on equipment. But to take ownership of your brand presence, you’ll need imagery designed around you, not used on potentially thousands of other random blogs by others.
A better option is to look for a content partner, like Design Pickle, that can create professional and on-topic images and graphics for your posts. Or, you can partner with a complete content agency like The Blogsmith, where we handle content creation from start to finish — including images.
4. Stay Consistent

A big part of following image best practices is consistency. A consistent style and color scheme helps blend your brand identity and blog content. It connects what you publish to your unique brand.
This is especially important for the featured images in each post. If you constantly swap between dark/moody images and bright cartoony GIFs , your readers will leave feeling confused.
You have more freedom to experiment with image choice and style deeper within the blog post, once your reader is already invested, but your primary images should always have a consistent feel to them. Be careful not to turn away your reader with a sudden change in style towards the end of the post.
5. Choose Image Placement Carefully
Another important point when looking at blog image best practices is where you place your photos and graphics.
Is one photo enough for a blog? Do you use one image for every heading? How many images go with a 2,000-word post?
The exact answer will vary for most blogs. But yes, you can overload your post with images.
A general rule of thumb is to stick to one image roughly every 300 words.
Break up walls of text with strategic image placement.
6. Include Alternate (Alt) Text
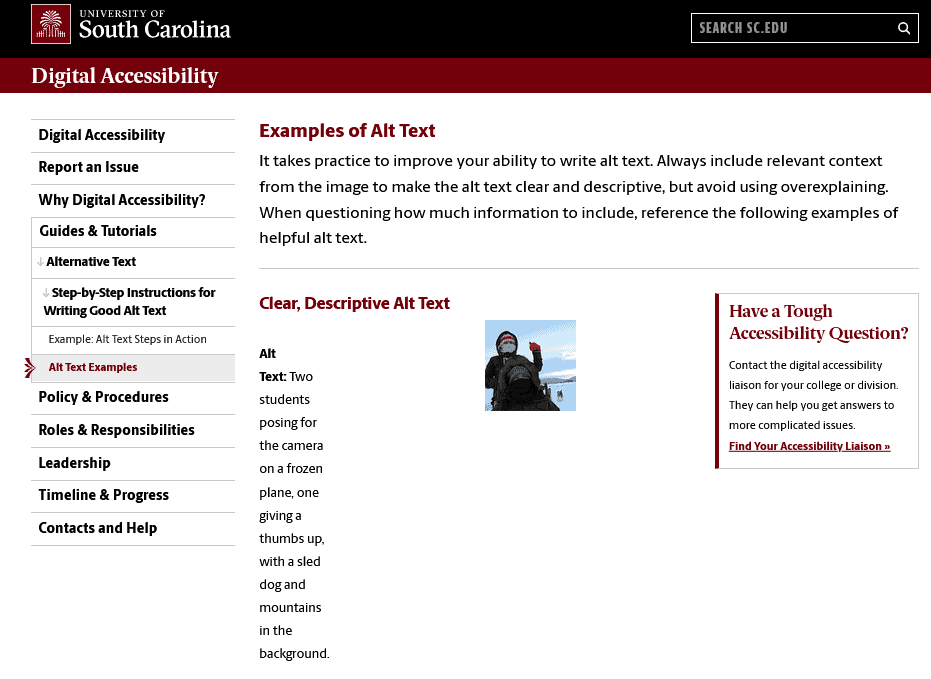
Always include an alternative text when adding images to your blog posts.
This is one of the key blog image best practices we emphasize in The Blogsmith Style Guide.
The alternate text should explain the image as this helps describe the image’s content for those who cannot view it or have other access issues. The direction we give our writers in The Blogsmith style guide is that they should be: “…incorporating the primary keyword (while also describing the image) that could also be used as an image caption.”
Google also uses alternative text to help it understand the context of the images since it can’t see the images the way most humans can.
7. Add a Featured Image

Screenshot
Last but not least, don’t forget a featured image. Otherwise, your articles will look orphaned when shared on other platforms and won’t be enticing for anyone to click on.
A featured image is the thumbnail that shows up with your blog post link when shared on social media sites.
Final Thoughts: Best Practices for Blog Images To Grow Your Audience
Images add flavor to written content much like salt and other spices brighten food flavors, transforming simple into spectacular.
Images also help break up the wall of text, making it easier to read. High-quality images help jump-start your readers’ imagination and quickly invest them in your article.
You can encourage readers to read through to the conclusion by upping your image game with these best image practices for your blog — which helps you convert more visitors.
Learn more about creating great visual and written content with The Blogsmith Founder, Maddy Osman’s book: “Writing for Humans and Robots: The New Rules of Content Style.”